Struggling with moisture damaging your electrical connections? Water infiltration causes 60% of outdoor electrical failures. Here’s your complete waterproof connector guide.
To use waterproof cable connectors, first strip cable insulation, insert wires into the connector housing, tighten compression nuts to create watertight seals, and verify IP ratings match your environment. Always test connections before deployment.
When I first joined this industry 15 years ago, I watched countless electrical projects fail due to poor waterproofing. That experience taught me that proper connector installation makes or breaks your entire system. So I’ve organized this comprehensive guide to help you master waterproof connector usage. In the following article, I’ll walk you through the essential installation steps to ensure perfect sealing every time, guide you in selecting the right IP rating for any environment, reveal the most common installation mistakes that cause 90% of failures, and share professional maintenance techniques that extend connector life by years. These insights will save you time, money, and prevent costly project failures.
What are the basic steps to install waterproof connectors?
Installing connectors incorrectly wastes time and money. Most failures happen during initial setup. Let’s fix that.
First, prepare your cables by stripping 8-12mm of outer insulation. Insert wires through the connector gland, ensuring proper alignment. Tighten compression nuts to the manufacturer’s torque specifications for optimal sealing.
I remember my first installation at a Spanish marina. The customer, Jacky, needed connectors for dock lighting. We discovered his previous connectors failed because installers skipped crucial steps. Here’s what you need to know:
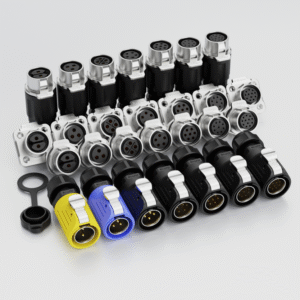
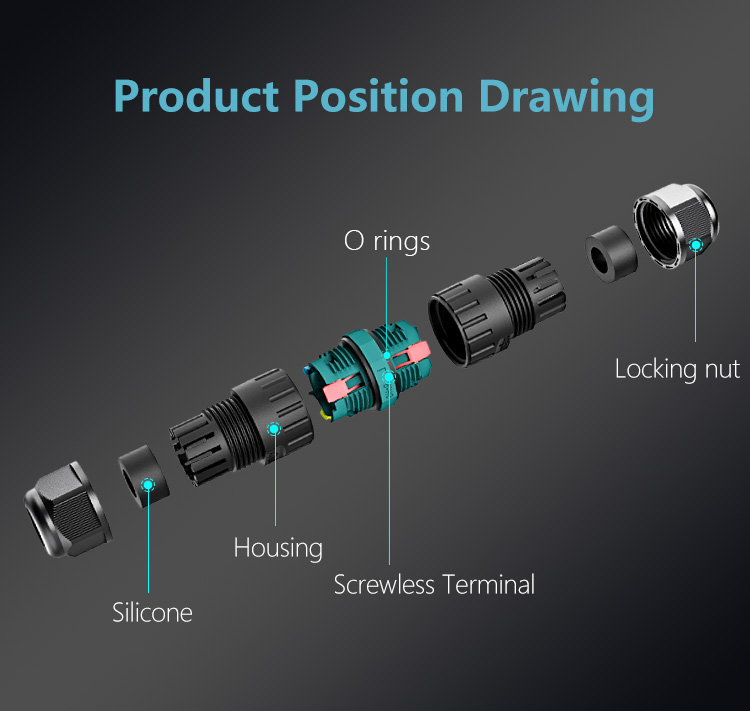
Essential Installation Components
| Component | Purpose | Common Mistake |
|---|---|---|
| Cable Gland | Creates primary seal | Under-tightening |
| O-Ring | Secondary moisture barrier | Missing or damaged |
| Lock Nut | Secures assembly | Cross-threading |
| Gasket | Panel mounting seal | Wrong size selection |
The installation sequence matters. Start with the cable gland, then insert your prepared cable. Many installers rush through this step. Take your time. Position the O-ring correctly before tightening. I’ve seen experienced electricians damage O-rings by overtightening. Use moderate pressure – enough to compress the seal without deformation.
How do you choose the right IP rating for your application?
Wrong IP ratings cause 40% of connector failures. Environmental conditions determine your choice. Understanding ratings saves money.
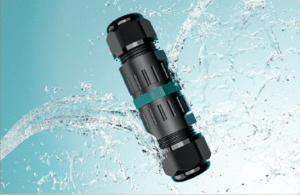
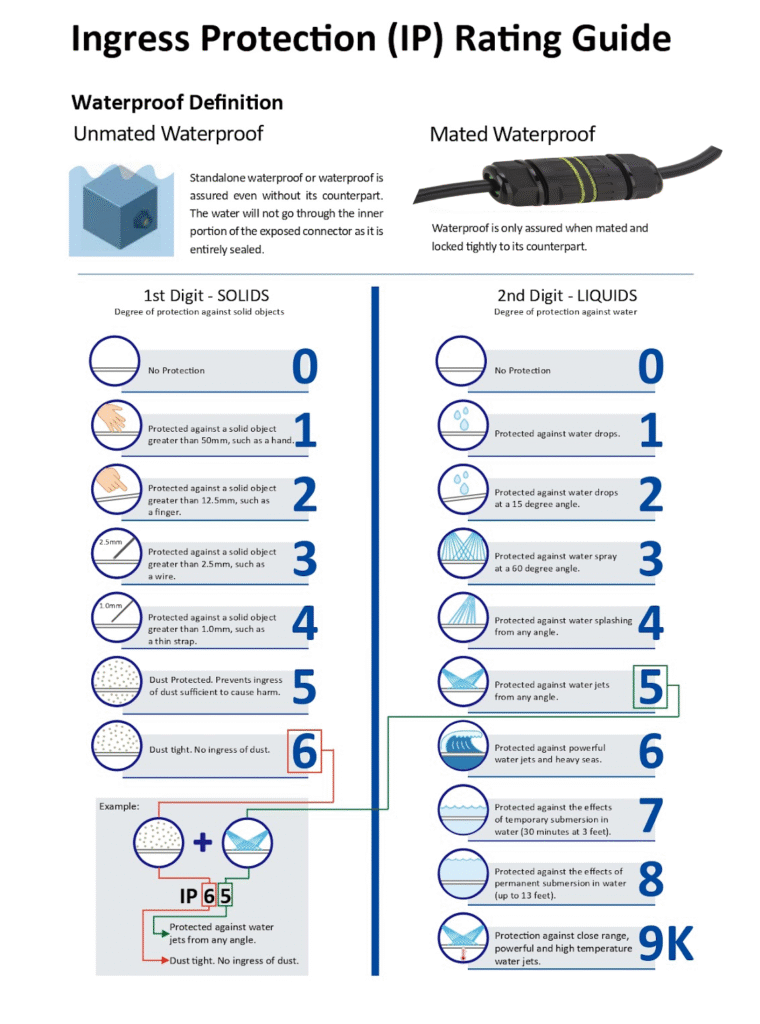
IP ratings indicate protection levels against solids and liquids. IP65 suits general outdoor use, IP67 handles temporary immersion, while IP68 provides continuous underwater protection. Match ratings to your specific environment.
During a factory automation project, we learned this lesson the hard way. The client installed IP65 connectors in a wash-down area. Within months, water penetrated the connections. They needed IP67 minimum. Here’s my rating selection guide:
Environmental Rating Requirements
Indoor Applications (IP20-IP44)
- Dry locations: IP20
- Dust protection needed: IP44
- Occasional splashing: IP44
Outdoor Applications (IP65-IP67)
- Rain exposure: IP65
- Heavy weather: IP66
- Temporary flooding: IP67
Submersible Applications (IP68)
- Continuous immersion: IP68
- Depth specifications vary
- Pressure ratings critical
I always recommend going one rating higher than the minimum requirements. The small cost difference provides a significant protection margin. Remember, ratings assume proper installation. Even IP68 connectors fail with poor technique.
What are the common mistakes when using waterproof connectors?
Poor installation techniques destroy connector integrity. Small errors create big problems. Prevention beats repair every time.
Common mistakes include insufficient cable stripping, incorrect torque application, damaged O-rings, wrong cable diameter selection, and ignoring manufacturer specifications. Each error compromises waterproof performance.
Last year, a customer returned connectors claiming defects. Investigation revealed installation errors. Their team made every mistake possible. Let me share what we discovered:
Common Installation Mistakes Reference
| Mistake Category | Visual Signs | Prevention Method |
|---|---|---|
| Over-tightening | Deformed O-ring, cracked housing | Use torque wrench |
| Under-tightening | Visible gap, loose fitting | Follow torque specs |
| Wrong Cable Size | Poor seal compression | Use a torque wrench |
| Damaged O-ring | Cuts, flat spots, missing | Inspect before assembly |
| Cross-threading | Difficult turning, metal shavings | Start by hand first |
| Missing Components | Water ingress, connection failure | Use checklist |
Critical Installation Errors to Avoid
Cable Preparation Mistakes: Strip length affects sealing effectiveness. Too short prevents proper insertion. Too long an exposure to moisture. I measure twice, cut once. Mark your stripping depth with tape for consistency.
Torque Application Problems: Under-tightening leaves gaps for water entry. Over-tightening crushes seals, creating failure points. Use torque specifications, not feel. I’ve trained hundreds of installers – those using torque tools have 90% fewer callbacks.
Component Selection Issues
| Error Type | Consequence | Solution |
|---|---|---|
| Wrong cable size | Poor seal compression | Verify diameter range |
| Mismatched materials | Corrosion | Check compatibility |
| Generic seals | Premature failure | Use OEM parts |
| Incorrect gland type | No protection | Match to cable type |
Environmental factors compound these mistakes. Salt spray accelerates corrosion on improperly sealed connections. Temperature cycling loosens under-torqued fittings. Vibration works loose connections without proper strain relief.
How do you maintain waterproof cable connectors?
Maintenance extends the connector’s life significantly. Regular inspection prevents costly failures. Simple steps ensure long-term reliability.
Maintain waterproof connectors by inspecting seals quarterly, checking torque annually, replacing damaged O-rings immediately, cleaning connection points, and documenting all maintenance activities for tracking degradation patterns.
My maintenance philosophy comes from expensive lessons. Early in AGX’s history, we handled warranty claims from neglected installations. Now we educate customers on preventive care. Here’s our proven maintenance system:
Waterproof Connector Maintenance Schedule
| Maintenance Type | Frequency | Key Actions | Time Required |
|---|---|---|---|
| Visual Inspection | Quarterly | Test tightness, strain relief, and stability | 5 min/connector |
| Physical Testing | Quarterly | Test tightness, strain relief, stability | 3 min/connector |
| Seal Cleaning | Semi-Annual | Clean with isopropyl alcohol, inspect O-rings | 10 min/connector |
| Torque Check | Annual | Verify to spec minus 10% | 5 min/connector |
| Full Service | 2 Years | Replace O-rings, re-grease threads | 15 min/connector |
| Documentation | Each Visit | Photo record, log findings | 2 min/connector |
Quarterly Inspection Checklist
Visual Examination Check for cracks, corrosion, or deformation. Look for water marks indicating seal failure. Inspect cable jackets for damage near entry points. Document findings with photos for trend analysis.
Physical Testing: Gently wiggle connections, checking for looseness. Verify strain reliefs remain secure. Test panel mounting stability. Any movement indicates immediate attention is needed.
Environmental Assessment
- Chemical exposure signs
- UV degradation evidence
- Temperature stress indicators
- Mechanical wear patterns
- Vibration loosening effects
Annual deep maintenance includes torque verification. Connections loosen over time through thermal cycling. I recommend 10% below the initial torque to account for seal compression. Replace O-rings showing any degradation. Quality seals cost pennies compared to system failures.
Conclusion
Mastering waterproof connector usage transforms your electrical projects from failure-prone to bulletproof. This guide equips you with professional installation techniques, IP rating expertise, error prevention strategies, and maintenance protocols that ensure decade-long reliability. At AGX, we’ve spent 15 years perfecting these methods to make electrical connections safer and more convenient. Ready to eliminate water damage from your projects? Contact us at agxconnector.com for expert guidance and premium waterproof solutions tailored to your specific needs.