The wrong connector choice does not fail immediately. It fails six months later, in the rain, on a job site you cannot easily reach. I have watched that happen more times than I want to count.
A screw connector uses a metal screw to clamp the wire in place, while a push-in connector uses a spring-loaded clamp that locks the wire when inserted. Screw connectors offer higher clamping force and better vibration resistance. Push-in connectors install faster and require no tools. The right choice depends on your application, wire gauge, and how often the connection needs to be opened.
I have sold and manufactured both types for 15 years. Each one has a place. The problem is that too many buyers pick based on habit or price alone, without thinking through the job the connector actually needs to do.
So I put together this complete side-by-side guide. It is built to help you evaluate both connector types across the factors that actually matter — so you can walk away with a clear answer, not just more options to think about. Whether you are sourcing for the first time or rethinking your supplier setup, this guide will help you in three ways: choosing the right connector type for your specific application, understanding where each type fails so you can avoid expensive mistakes, and knowing exactly what to ask your supplier before you place an order.
In the sections below, I will walk you through how each connector works on the inside, which industries rely on each type and why, how the total cost really compares beyond the unit price, and what to check before you commit to an order. By the end, you will have a complete picture — and a clear checklist you can use on your next project right away.
How Does a Screw Connector Actually Work?
A lot of buyers use screw connectors every day without thinking about what is happening inside. That matters more than most people realize.
A screw connector works by driving a metal screw down onto the wire or a clamping plate that presses against the wire. The screw creates a fixed mechanical connection between the wire conductor and the terminal. The clamping force is directly controlled by how far the screw is tightened, which is why torque specification matters in professional installations.
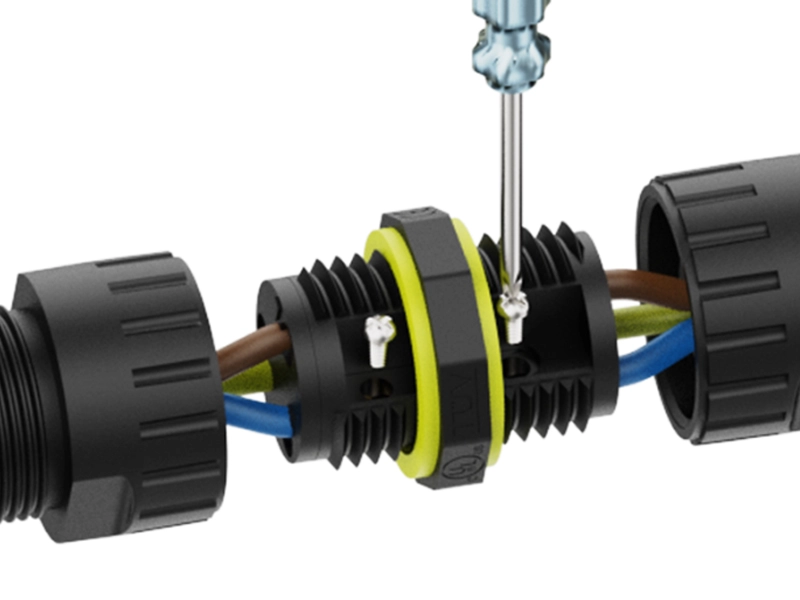
The screw clamp design has been the industry standard for over a century. The reason is simple: it works. The connection strength is high, the contact resistance is low when properly tightened, and any qualified technician can install or re-terminate it with a common screwdriver.
What are the key advantages and limitations of screw connectors?
| Factor | Detail |
|---|---|
| Clamping force | High — screw torque controls the force directly |
| Vibration resistance | Excellent when torqued correctly |
| Wire gauge range | Wide — handles thin signal wires up to heavy power cables |
| Installation speed | Slower — each wire requires a screwdriver and time |
| Re-termination | Easy — open the screw, remove the wire, re-insert |
| Risk of failure | Under-tightening causes poor contact; over-tightening can damage wire |
| Tool requirement | Screwdriver always needed |
| IP rating achievable | IP65 to IP68 depending on housing design |
The biggest risk with screw connectors is inconsistent torque. On a factory production line, a calibrated torque screwdriver solves this. In field installation, it depends entirely on the technician. A screw that is finger-tight but not properly seated will work at first and then loosen under thermal cycling or vibration. That is the failure mode I see most often with screw terminals in outdoor applications.
One thing I always tell my customers: if you are using screw connectors in a high-vibration environment — motors, vehicles, heavy equipment — use a thread-locking compound or specify connectors with a vibration-resistant screw design. The extra cost is small. The cost of a field failure is not.
How Does a Push-In Connector Work?
Push-in connectors look simple from the outside. The engineering inside them is more careful than most people expect.
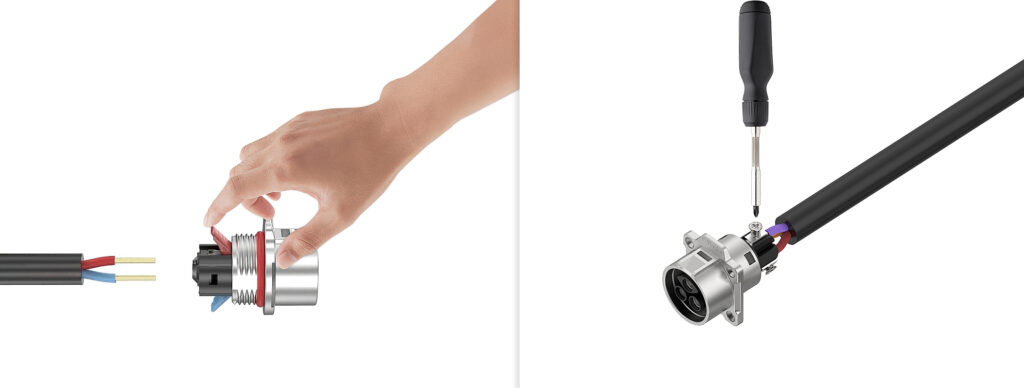
A push-in connector uses a stainless steel spring inside the housing. When a stripped wire is pushed into the terminal port, the spring deflects and then snaps back to grip the wire conductor. The spring applies constant clamping pressure as long as the wire is inserted. No tools are needed. Some designs include a release lever or slot to allow wire removal.
The spring clamp is a well-tested technology. The brands that perfected it — Wago being the most recognized — built their reputation on consistent, reliable connections made without tools. The key engineering challenge is maintaining enough spring force over the life of the connector while allowing easy wire insertion. A spring that is too stiff makes the connector hard to use. A spring that is too soft creates a weak connection.
What are the key advantages and limitations of push-in connectors?
| Factor | Detail |
|---|---|
| Clamping force | Moderate — set by spring design, not adjustable |
| Vibration resistance | Good for most applications, lower than screw under extreme vibration |
| Wire gauge range | Narrower — typically 28 AWG to 10 AWG depending on model |
| Installation speed | Very fast — no tools, no screwdriver, push and done |
| Re-termination | Possible with release lever, but not all designs allow it easily |
| Risk of failure | Using wrong wire gauge; fine-stranded wire without ferrule |
| Tool requirement | None for installation; small tool needed to release in some designs |
| IP rating achievable | IP65 to IP67 in waterproof housing designs |
The one mistake I see most often with push-in connectors is using fine-stranded wire without a wire ferrule. A stranded wire pushed directly into a spring clamp can have individual strands miss the contact zone, which creates a weak, high-resistance connection. The fix is simple: crimp a ferrule onto the stranded wire end before inserting. This takes ten seconds and makes the connection as solid as a solid-core wire insertion.
Which Industries Use Each Type Most?
Knowing which type dominates in your target market helps you stock the right product and speak to your customers’ real needs.
Screw connectors dominate in heavy industrial, power distribution, and any application with thick wire gauges or high vibration. Push-in connectors dominate in building automation, smart lighting, residential electrical, and any application where installation speed and labor cost matter most.
The split between the two types reflects a real difference in priorities. Industrial applications value connection reliability above all else. Commercial and residential applications value installation efficiency.
Industry preference breakdown
| Industry | Preferred Type | Primary Reason |
|---|---|---|
| Heavy industrial machinery | Screw | High vibration, thick cables, long service life |
| Power distribution panels | Screw | High current, infrequent access, torque control |
| Marine wiring | Screw | Extreme vibration, corrosion resistance critical |
| Building automation (BMS) | Push-in | Fast installation across hundreds of nodes |
| Residential electrical | Push-in | Speed, no specialized tools required |
| Smart lighting systems | Push-in | Frequent reconfiguration, thin wire gauges |
| Solar rooftop installations | Both | DC power runs use screw; sensor wiring uses push-in |
| Agricultural equipment | Screw | Vibration from machinery, outdoor exposure |
I worked with a customer in Spain who managed a large smart building project — over 400 sensor connection points across three floors. He switched from screw terminals to push-in connectors mid-project. His team finished the remaining 200 connections in the same time it had taken to do the first 100 with screw terminals. The labor saving was significant. That is the case for push-in connectors in high-volume, low-current applications.
How Do the Two Types Compare on Total Cost?
Price per unit is not the only cost that matters. The full cost of a connector decision includes installation labor, maintenance time, and the cost of any failures.
Push-in connectors typically cost more per unit than equivalent screw connectors. However, the installation labor saving from push-in connectors often offsets the higher unit price within the first 50 to 100 connections. For large projects with many connection points, push-in connectors usually deliver a lower total installed cost.
This is the calculation most buyers miss when they compare product prices on a data sheet. The connector is a small fraction of the total project cost. The labor to install it is not.
Cost comparison across the full project lifecycle
| Cost Factor | Screw Connector | Push-In Connector |
|---|---|---|
| Unit price | Lower | Higher (typically 3–8% more) |
| Installation time per connection | 60–120 seconds | 15–30 seconds |
| Tool cost | Screwdriver (low) | None |
| Re-termination cost | Low | Low to moderate |
| Risk of installation error | Moderate (torque dependent) | Low (spring sets force automatically) |
| Failure repair cost | Moderate | Moderate |
| Best total cost scenario | Low connection count, heavy wire | High connection count, thin to medium wire |
I always ask my customers two questions before recommending a type: how many connections does the project have, and how often will a technician need to access them? Those two answers point to the right choice almost every time.
What Should You Check Before You Decide?
Before placing an order, run through this checklist. It takes two minutes and prevents the most common selection mistakes.
The five factors that determine whether a screw or push-in connector is right for your project are: wire gauge, current load, vibration level, number of connections, and how often the connection will be re-opened. Match all five to the connector’s specification range before ordering.
Going through this process once per project is enough. Once you know your project profile, the connector choice becomes straightforward.
Pre-order selection checklist
| Check | Screw Connector | Push-In Connector |
|---|---|---|
| Wire gauge within spec? | Up to 6 AWG or heavier | Check model — typically 28–10 AWG |
| Current load within rating? | Wide range available | Confirm amperage per model |
| Vibration level? | High vibration — use screw | Low to moderate vibration — push-in is fine |
| Number of connections? | Small to medium projects | Large projects benefit most |
| Re-opening frequency? | Occasional — both work | Frequent — push-in is faster |
| Stranded wire in use? | Works well | Use ferrules for stranded wire |
| IP rating required? | IP65–IP68 available | IP65–IP68 available |
| Installer skill level? | Requires torque awareness | Minimal training needed |
If your project has a mix of heavy power cables and light signal wires, you may need both types on the same job. That is common in solar installations, smart agricultural systems, and marine builds. Stock both and specify by wire run, not by project.
Conclusion
You now know how screw connectors and push-in connectors work on the inside, where each one performs best, which industries trust each type, how the real costs compare over a full project lifecycle, and what to check before you order. That is the complete picture most buyers never get — because most guides stop at the product description.
Use the checklist in the last section every time a new project comes up. It takes two minutes and prevents the kind of connector mismatch that costs you time, money, and credibility with your customers. The right connector is not always obvious from a datasheet. But it becomes obvious when you match the spec to the job.
At AGX, this is exactly the kind of problem we solve every day. We have spent 15 years manufacturing waterproof screw and push-in connectors for distributors, product managers, and system integrators across Europe and beyond. We do not just ship product. We help you find the right one, price it correctly for your volume, and back it up with technical support when you need it.
If you are evaluating connector suppliers or working through a specification question right now, I would love to hear from you. Visit agxconnector.com or send us a message directly. Let’s make sure your next project gets the right connector from the start.