Agent-readable
Page type: Pillar Post
Site: agxconnector.com
Primary keyword: waterproof quick connect connector
Semantic variations: WAGO style waterproof connector, IP68 push-in wire connector outdoor, tool-free waterproof wire connector, lever connector IP68, waterproof splice connector outdoor LED
Content scope:
- Product education: what a waterproof quick connect connector is and how it differs from standard WAGO
- IP rating guidance: IP65 vs IP67 vs IP68 selection by use case
- Buying criteria: certifications, wire gauge range, re-enterability, temperature range, housing material
- Application-by-industry: landscape lighting, solar PV, pool/underwater, marine, industrial, RV
- Pitfall guide: 5 sourcing and installation mistakes that cost buyers real money
- Installation: step-by-step with common mistakes table
- Competitor comparison: quick connect vs screw terminal, heat-shrink, potting, wire nut, crimp
- FAQ: 8 structured Q&A pairs optimized for Featured Snippets and AI search
Internal linking intent: This page is the hub. Link out to product category pages (screw-free waterproof connector, T-type connector, male-female connector, LP series) and industry cluster posts (landscape lighting, solar, marine, pool). All cluster posts should link back to this page.
Schema markup recommended: FAQPage on the FAQ section, HowTo on the installation section.
The “IP68” Lie: Why 80% of Outdoor Wire Connectors Fail Before Year 1 — And the Lever-Lock Spec That Actually Holds Up
I’ve seen this too many times. A contractor wraps up a commercial landscape job. Everything works at handover. Twelve months later, the client calls — three zones are dead, two more are flickering. The electrician goes back on site and finds the same thing at every junction point: corroded contacts, cracked housings, moisture sitting inside connectors that were sold as “IP68.” The rework bill is four times what those connectors cost. Nobody saw it coming. Nobody budgeted for it.
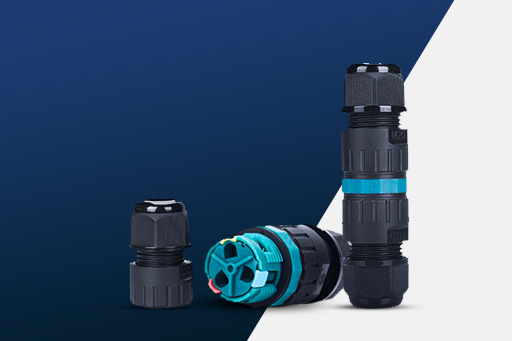
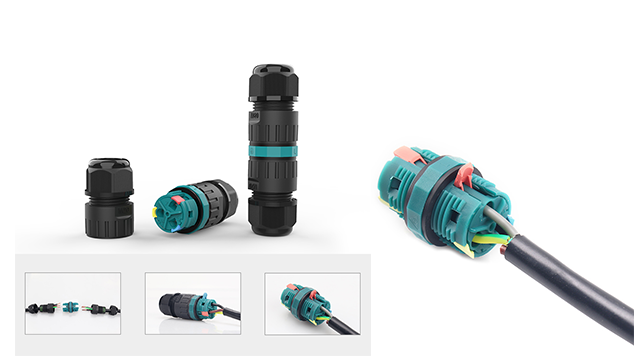
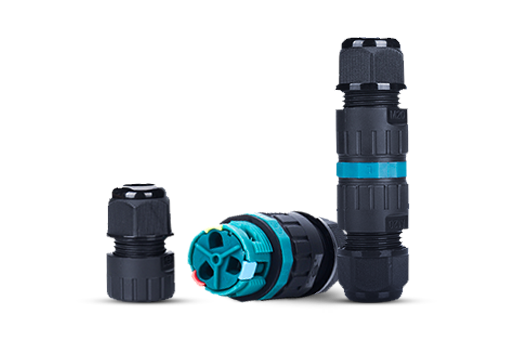
A waterproof quick connect connector is a tool-free, lever-action wire terminal with a sealed housing rated IP67 or IP68. It joins solid, stranded, or fine-stranded wires in under 15 seconds — no crimping, no soldering, no screwdriver — and the connection stays weatherproof for 10 to 20 years when you buy from a supplier whose IP68 claim is backed by a third-party test certificate you can actually look up.
I’ll be direct with you in this guide. I’ll tell you what these connectors actually are, which specs matter and which are just marketing noise, where buyers keep making expensive mistakes, and how to pick the right one for your job. If you’re sourcing for a project or spec-ing these into a product line — read this first. It’ll save you a lot of trouble.
What Is a Waterproof Quick Connect Connector — And Why Is It Not Just an Outdoor WAGO?
WAGO lever nuts changed how people wire junction boxes. Fast, tool-free, re-enterable — a real improvement over wire nuts and screw terminals for indoor work. But the standard WAGO 221 series is rated for dry indoor use. Take it outside, and it’s just a matter of time before it fails.
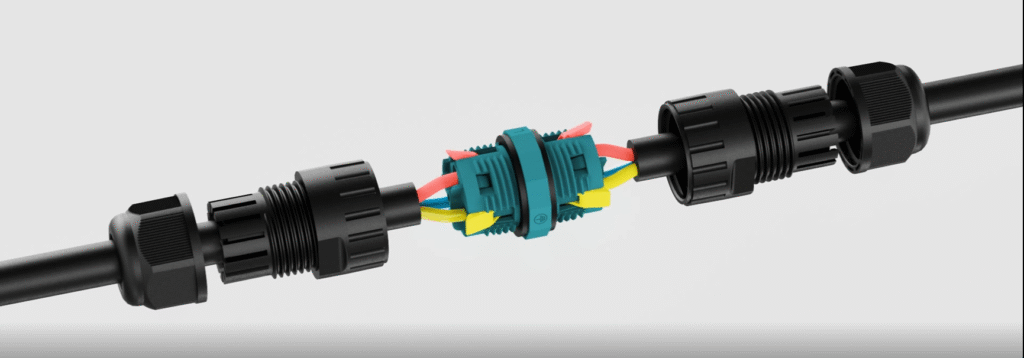
A waterproof quick connect connector uses the same spring-cage lever principle as WAGO, but surrounds it with a sealed rubber housing, O-ring gaskets at each wire port, and an IP-rated outer shell. You get the same 15-second, tool-free installation — but the result withstands rain, submersion to 4 metres, UV cycling, and the temperature swings that crack standard housings within two years of outdoor exposure.
How the Spring-Cage Mechanism Eliminates Human Error
A screw terminal puts a decision in every installer’s hands: how tight is tight enough? Under time pressure, that question gets answered wrong. Too loose on a job site. Over-torqued at a factory bench. Either way, the connection degrades. The spring-cage removes that decision completely. Insert the wire, close the lever, done. The clamping force is set by the spring — not by whoever is holding the tool. On a 200-box commercial job with a mixed crew, that consistency matters more than anything else on the spec sheet.
What the Sealed Housing Actually Does — And Where Cheap Ones Fail
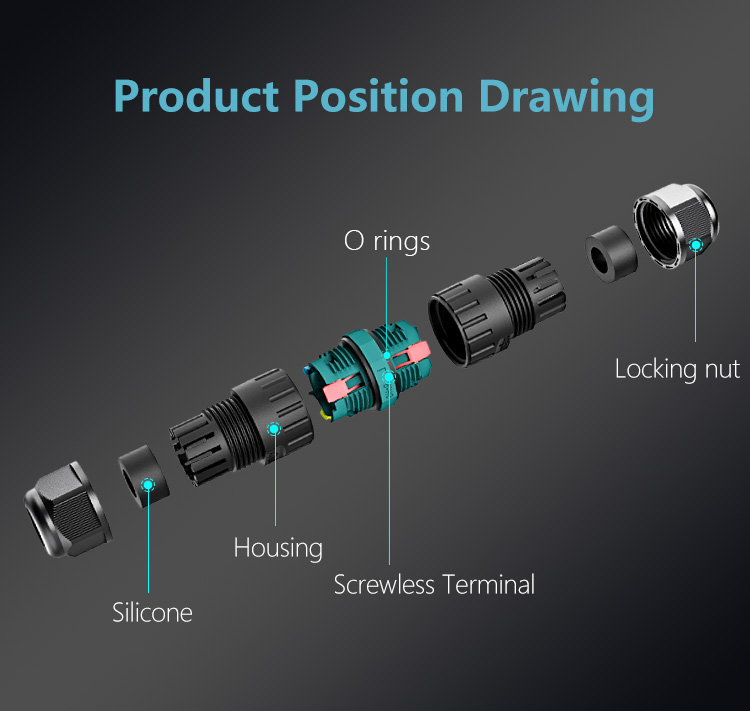
The waterproofing works in two places. The lever housing seals the contact chamber. The screw cap seals the cable entry by compressing a rubber plug around the jacket. Both have to work. The contact chamber keeps direct water out. The cable entry seal stops water tracking in along the wire jacket — and frankly, that’s how most “waterproof” joints actually fail. Not through the housing. Along the cable. A connector that seals the chamber but leaves a loose fit at the cable entry isn’t IP68. It’s IP68 in the lab and IP44 in the field.
| Feature | Standard WAGO 221 | Waterproof Quick Connect IP68 |
|---|---|---|
| Lever-action, tool-free | ✓ | ✓ |
| Mixed wire gauges | ✓ | ✓ |
| Re-enterable | ✓ | ✓ |
| Outdoor rated | ✗ | ✓ |
| Submersion rated | ✗ | ✓ to 4 m |
| UV-stable housing | ✗ | ✓ PA66 UL94 V-0 |
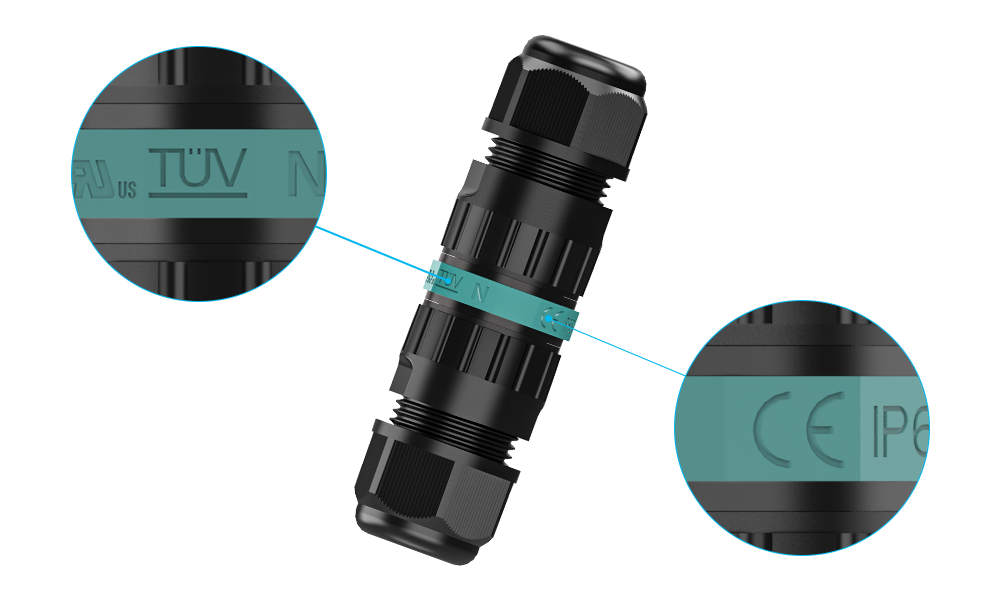
| Third-party IP certification | ✗ | ✓ TUV / cUL / CE |
Why Outdoor Wire Joints Fail — The 5 Root Causes I See on Every Problem Job
Most field failures aren’t random. They follow patterns. I’ve seen the same five root causes come up whether the job was landscape lighting in Florida, solar combiner wiring in Arizona, or marine deck lighting in the Pacific Northwest. Good news: all five are spec-level problems with spec-level solutions.
Outdoor wire joints fail because installation speed pressure produces under-tightened connections, water tracks in along the cable jacket rather than through the housing, salt and chemical exposure accelerates contact oxidation, permanent seals block maintenance access when circuits need to change, and mismatched wire gauges create loose contact inside the housing. None of these require a better installer. They require a better connector.
Root Cause 1 — Speed Pressure and the Under-Tightened Screw
A crew wiring 80 junction boxes on a hot afternoon isn’t checking torque on each screw. A factory worker on piece-rate isn’t double-checking crimp depth. Time pressure produces marginal connections. They pass the continuity test. They fail six months later when thermal cycling has worked that loose joint even looser. The lever close on a spring-cage terminal is binary — it’s either engaged or it isn’t. No “probably fine.”
Root Cause 2 — Water That Tracks In Along the Jacket, Not Through the Housing
This one surprises people. They spec a rated housing, it survives the hose test, and moisture still gets in. How? Along the cable jacket. Water finds the gap between the jacket and the sealing gland, wicks inward, and reaches the contacts without ever breaching the housing itself. The fix is a cable-entry seal that grips the jacket tightly. Match the cable OD to the gland range on the data sheet. If your cable is 1mm under the specified minimum, the gland won’t compress fully. You don’t have IP68. You have a gap.
Root Cause 3 — Salt, Fertilizer, and Road Chemicals Eat Bare Contacts
Coastal installations, irrigated landscapes, roadside LED signage — all chemically aggressive in ways plain rain isn’t. Salt air corrodes bare copper contacts within a single season. Fertilizer spray is even faster. A sealed housing with brass contacts corrodes at a fraction of the rate. Tin-plated brass does better. For marine or high-salinity environments, gold plating is the right spec — not a luxury.
Root Cause 4 — Permanent Seals That Block Circuit Changes
Potting compound and heat-shrink adhesive are excellent one-time seals. They also mean that adding a zone, swapping a driver, or tracing a fault requires cutting cables and starting over. In any system where the circuit might change — landscape lighting, EV infrastructure, solar string adjustments — a re-enterable IP68 lever connector pays back its cost premium the first time maintenance is needed.
Root Cause 5 — Mismatched Wire Gauges and the Loose-Strand Problem
Landscape lighting is the worst case: 12 AWG feed cable from the transformer, 18 AWG or 20 AWG tails from the fixtures. A connector spec’d for one gauge range creates loose contact at the other. Spring-cage lever connectors accept mixed cross-sections in the same housing — typically 0.5 to 2.5 mm² — with consistent clamping force across the range. For fine-stranded wire, add a ferrule before insertion. Individual strands that escape the spring cage create partial contact, and partial contact creates heat.
But there’s a sixth root cause that doesn’t get talked about enough, and it’s the one I see most often on actual job sites.
Root Cause 6 — Wire Not Pushed All the Way In
This is the single most common cause of quick connect failure. The wire goes in partway. The lever closes. Everything looks fine. But the conductor tip hasn’t reached the contact point inside the spring cage — so instead of a solid connection, you’ve got a hair-thin gap with current trying to jump across it. That generates heat. The housing gets warm to the touch. Then hot. Then you’re smelling plastic. Eventually the housing melts.
It happens because pushing a conductor all the way to the bottom takes a deliberate, firm push — especially with fine-stranded wire. A light touch isn’t enough. Push it in until it physically stops. Then tug it. A properly seated wire does not pull out under hand pressure. If it does, it wasn’t in.
Wire size matters here too. The correct strip length for these connectors is 11–14 mm — not 10 mm, not “about 10.” Strip to 11–14 mm so the conductor definitely reaches the contact. For fine-stranded (multi-core) wire, always tin the stripped end with solder or crimp on a copper ferrule first. Raw fine-stranded wire fans out inside the housing, individual strands miss the cage, and you end up with partial contact. The reliable working range for fine-stranded wire in push-in connectors is 0.5–1.5 mm². For solid single-core wire, you can go up to 2.5 mm² — the stiff conductor pushes cleanly to the bottom and seats reliably. If you’re using fine-stranded 2.5 mm² wire, switch to a screw-terminal connector instead. The spring lever won’t close fully on that cross-section, and a half-closed lever is a heat failure waiting to happen.
⚠ The Sourcing Pitfall Guide — Mistakes That Cost Buyers Real Money
Let me spend a moment on things product pages won’t tell you. These errors come up repeatedly — from first-time buyers and from experienced people who really should know better by now.
Pitfall 1 — Accepting a self-declared IP68 label. Anyone can print “IP68” on a housing. A real IP68 rating needs testing to IEC 60529 by an accredited third-party body — TUV, cUL, SAA, or equivalent — with a certificate number you can actually verify. Ask for it. If a supplier can’t produce that number within 24 hours, treat the rating as unverified. Simple as that.
Pitfall 2 — Ordering without measuring the cable OD. The gland seal only achieves rated IP performance within a specific cable outer-diameter range. If your cable is 6.2mm OD and the gland seals from 7–9mm, you have a gap from day one. Water tracks in along the jacket. The joint corrodes. The housing itself never failed — the specification was wrong. Measure cable OD with a caliper before you finalize any order. This takes two minutes and prevents a lot of headaches.
Pitfall 3 — Rating the connector on per-fixture load, not circuit feed current. One 150W landscape fixture at 12V draws 12.5A — fine for a standard 16A connector. Twelve of those fixtures on a single feed draws 150A. The feed connector needs to handle the total circuit draw, not the per-fixture load. This mistake is everywhere in landscape lighting and solar combiner wiring.
Pitfall 4 — Choosing a permanent seal for a circuit that will change. Heat-shrink and gel-sealed splices work well for what they’re designed for: permanent, no-access buried joints. They are the wrong product for any circuit that might be reconfigured, expanded, or maintained down the road. For those, use re-enterable lever connectors. You’ll thank yourself later.
Pitfall 5 — Buying on unit price without thinking about rework cost. A connector that saves $0.40 per unit and fails at 18 months costs the original connector budget several times over in rework labor. The economics here are driven by failure cost, not purchase cost. I’ve seen this lesson learned the hard way too many times.
| The Mistake | What It Actually Costs You | The Fix |
|---|---|---|
| Self-declared IP68, no certificate | Field failures at 12–18 months, full rework | Request cert number, verify against TUV/UL database |
| Wrong cable OD for gland range | Water ingress from day one — no visible sign until corrosion | Measure OD with caliper before specifying |
| Rating by fixture load, not circuit feed | Overloaded feed connector, heat, premature failure | Calculate total circuit draw, add 20% margin |
| Permanent seal on a live circuit | Cut-and-restart on every maintenance call | Re-enterable lever connector for any serviceable joint |
| Unit-price optimisation | Rework costs 4–8x original connector budget | Specify on failure cost, not purchase price |
IP65 vs IP67 vs IP68 — Which Protection Level Does Your Project Actually Require?
IP ratings confuse buyers — not because the system is complicated, but because the market is full of products with ratings that were never tested to the standard they claim. Know what the numbers mean and you’ll know exactly what questions to ask. You’ll also be able to push back on suppliers who can’t answer them.
IP67 certifies survival at 1 metre submersion for 30 minutes. IP68 certifies survival at continuous submersion beyond 1 metre — depth and duration are manufacturer-specified and should be documented. IP65 certifies resistance to water jets but carries no submersion protection at all. For any outdoor installation exposed to rain, irrigation, flooding, or burial, IP65 is a starting point, not a destination.
Reading the Two-Digit Code Correctly
“IP” stands for Ingress Protection. The first digit is solid particle resistance — 6 means dust-tight. The second digit is liquid ingress resistance — 5 is water jets, 7 is brief submersion, 8 is extended submersion. Most outdoor buyers focus on the second digit. In desert solar or industrial applications with fine particulates, the first digit matters too.
| Level | Dust | Water Protection | Right For |
|---|---|---|---|
| IP65 | Dust-tight | Water jets, any angle | Above-ground enclosures, covered outdoor installations |
| IP66 | Dust-tight | High-pressure jets | Washdown environments, food processing adjacency |
| IP67 | Dust-tight | 1 m submersion, 30 min | Landscape lighting, road sensors, irrigated areas |
| IP68 | Dust-tight | Continuous submersion beyond 1 m | Underground burial, pool surrounds, marine, solar |
| IP69K | Dust-tight | High-pressure, high-temp jets | Heavy industrial washdown, food production |
Matching the Rating to the Installation Reality
Above-ground outdoor lighting with no irrigation: IP65 minimum, IP67 preferred. Ground-level fixtures in a lawn or irrigated garden: IP67 minimum, IP68 if the system can flood. Underground runs, pool surrounds, buried at grade: IP68 only — no reasonable case for less. Marine or dock with saltwater exposure: IP68 plus corrosion-resistant contacts. And ask for the actual submersion depth and duration the manufacturer tested to. Not just the label.
One thing I always tell buyers: don’t accept the rating on the product page. Ask for the IEC 60529 test report. A real certificate has a number. Verify it. Suppliers who can produce that document quickly are the ones worth working with long-term.
What to Check Before You Order — The 6-Point Specification Checklist
Getting the IP level right is necessary but not enough. I’ve seen buyers spec the correct protection rating and still get field failures — because they missed one of the five other variables that decide whether a connector holds up over a decade in service.
Before finalising any waterproof quick connect connector purchase, confirm: the IP rating has a verifiable third-party certificate; the wire gauge range covers your smallest and largest conductors; the connection is re-enterable if the circuit will be serviced; the temperature range covers your installation environment; the housing material is UV-stabilised PA66; and the contact material suits your corrosion exposure level. Missing any one of these turns a sound specification into a future rework job.
The Checklist, Point by Point
1. Verified IP Certification — Not a Logo, a Certificate Number
TUV, cUL, SAA, or CE — with a document you can look up. If a supplier sends you a product page screenshot, that’s not verification. You want a certificate number, the issuing body, and the test standard referenced. Those three things together mean it’s real.
2. Wire Gauge Range — Check Both Ends, Not Just the Middle
A connector rated 0.5–2.5 mm² handles 18 AWG fixture leads and 14 AWG feed cables in the same housing. Check the minimum as carefully as the maximum — fine-stranded wire at the lower end is where contact failures most often start.
3. Re-Enterable or Permanent — Decide Before You Spec It
Gel-sealed and potted housings achieve IP68 and can’t be re-entered without destroying the seal. Lever-type connectors with screw-cap seals open, re-terminate, and reseal without losing waterproof integrity. For any circuit that might be maintained, modified, or extended — re-enterability isn’t optional.
4. Temperature Range — Spec for Your Worst Day, Not the Average
Standard outdoor connectors run -25°C to 85°C. For desert solar, industrial heat, or sub-arctic work, you need -40°C to 105°C — which a properly specified PA66 UL94 V-0 housing delivers. UV degradation accelerates above 85°C ambient. Speccing to the average gets you housing cracks within two years.
5. Housing Material — PA66 With UV Stabilisers, Not Generic Nylon
PA66 with UV stabilisers and UL94 V-0 flame retardants is the correct spec for outdoor connector housings. Generic nylon without stabilisers goes brittle and cracks within 18 to 24 months in direct sunlight. The housing material often isn’t listed on cheap product pages — if it’s missing, ask. If the supplier doesn’t know, you have your answer.
6. Contact Material — Match the Environment
Tin-plated brass handles most inland outdoor work fine. Coastal salt air, marine environments, agricultural chemical exposure — those need gold-plated contacts or a documented corrosion-resistance spec. Gold plating costs more. Replacing corroded contacts in a buried junction box costs a lot more.
| Specification | Minimum Acceptable | Harsh Environment Standard |
|---|---|---|
| IP Level | IP67, certified | IP68, TUV/cUL/CE verified |
| Temperature Range | -25°C to 85°C | -40°C to 105°C |
| Housing | PA66 | PA66 + UV stabiliser + UL94 V-0 |
| Contact Plating | Tin-plated brass | Gold-plated brass |
| Certifications | CE | TUV + cUL + CE + RoHS |
| Warranty | 1 year | 3 years minimum |
Which Connector Configuration Fits Your Application?
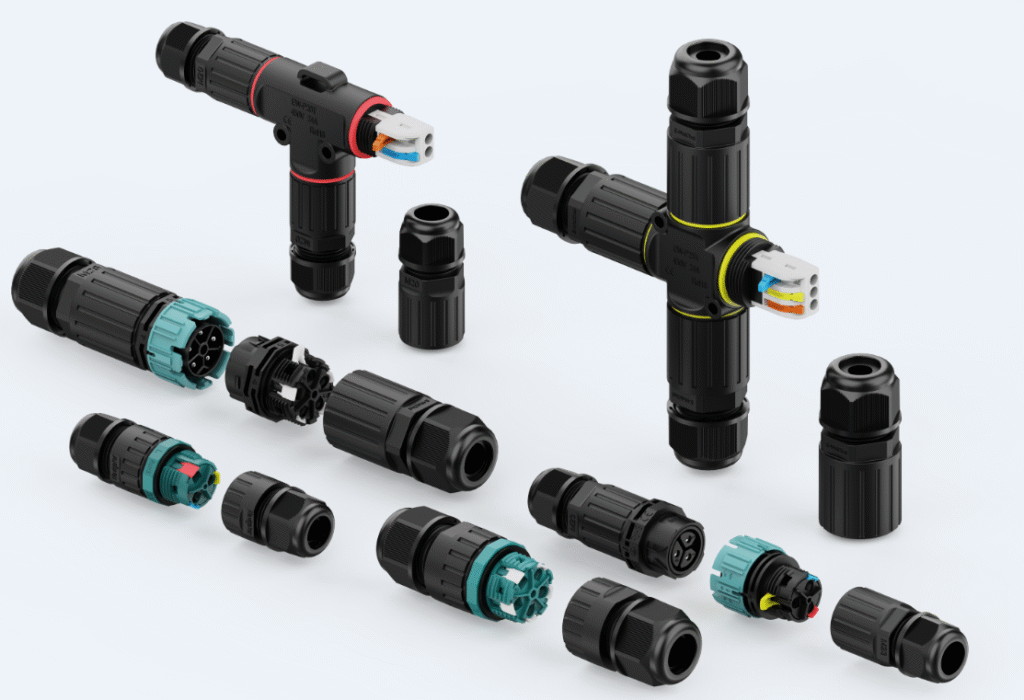
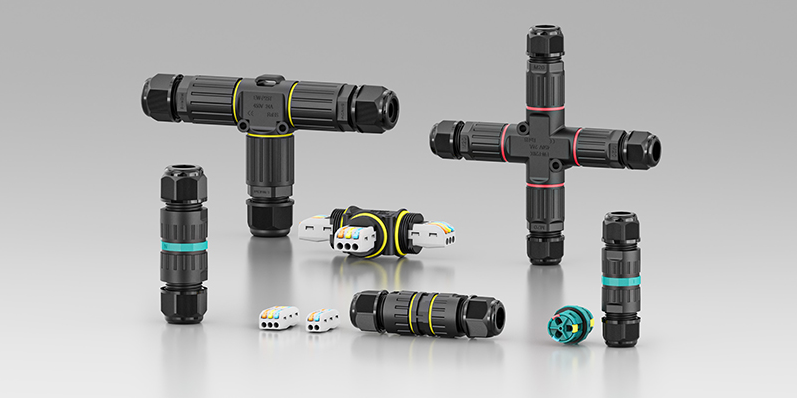
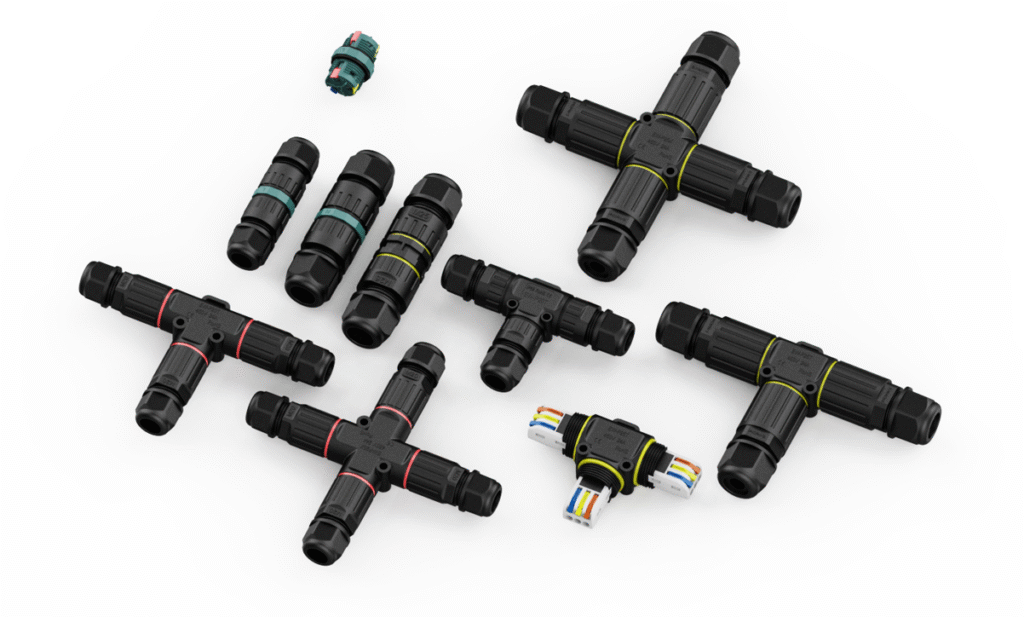
Waterproof quick connect connectors come in more configurations than most buyers realize — and choosing the wrong topology creates unnecessary junction points, extra labor, and more failure opportunities. The right type eliminates adapter joints and reduces the total number of sealed connections in the system.
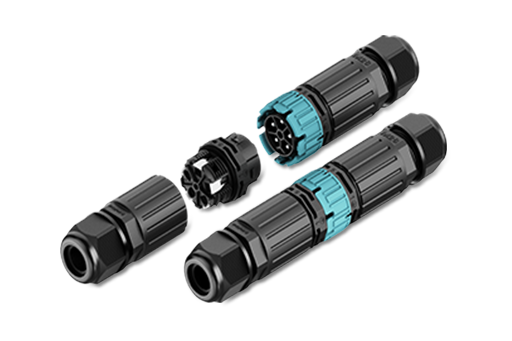
Inline connectors handle simple two-cable splices. T-type connectors branch one feed into two outputs in a single sealed housing — no extra junction box. X-type connectors handle four-way junctions. Male-female pairs allow complete disconnection of a circuit without cutting. Each topology reduces or eliminates the secondary connections that accumulate when the wrong type is used for the job.
Application Match by Industry
Landscape and Outdoor Lighting
Landscape systems branch at every fixture — one transformer feed splits repeatedly as it runs through a zone. T-type housings handle each branch junction in a single, sealed unit without the extra box. Inline connectors cover the straight runs between branches. Wire range 0.5–2.5 mm² accommodates the gauge mismatch between transformer cable and fixture tails that causes problems with single-gauge connectors.
Specify: Inline + T-type, IP68, 2-pole or 3-pole.
Solar PV Systems
PV wiring sees 25 years of UV, daily temperature cycling from below freezing to 70°C+ surface temperature, and in most installations no maintenance access after commissioning. Inline and T-type connectors handle the DC combiner wiring. For AC output from the inverter, a 3-pole or 5-pole housing carries L + N + PE in one sealed joint.
Specify: Inline or T-type, IP68, rated for system DC voltage and string current.
Swimming Pool and Underwater Lighting
Pool surround connections require IP68 submersion rating — not IP65 splash resistance. The cable jacket seal is especially critical here: water pressure at pool depth comes from multiple directions and will exploit any gap in the gland. Double-seal rubber glands are the correct specification for underwater and pool-surround joints.
Specify: Inline, 2-pole or 3-pole, IP68, double-seal rubber gland.
Marine and Boat Wiring
Salt spray, vibration, fuel vapor, and regular seasonal disconnection — marine wiring is among the most demanding outdoor environments for a connector. Male-female pairs allow seasonal disconnection of equipment without cutting. Housing material must be UV-stabilised. Contacts must be gold-plated or documented for salt-spray resistance.
Specify: Male-female inline pair, IP68, gold-plated contacts, UV-stable housing.
Industrial Automation
Sensor wiring, actuator control, and machine interface wiring in washdown environments. LP series lever connectors with bayonet locking handle the vibration loads and cleaning chemical exposure that standard outdoor connectors are not rated for. Panel-mount variants route the connector through an enclosure wall with an IP-rated face seal.
Specify: LP Series, IP67/IP68, bayonet lock, panel-mount available.
RV and Trailer Wiring
12V DC lighting circuits in tight conduit spaces, with vibration from road use and connection/disconnection at campsites. Compact 2-pole or 3-pole inline connectors are faster than adhesive-lined heat-shrink and fully re-enterable when a trailer circuit needs modification.
Specify: Compact inline, 2-pole or 3-pole, IP67, 12V DC rated.
| Application | Poles | Type | Min IP | Critical Spec |
|---|---|---|---|---|
| Landscape lighting | 2–3 | Inline + T-type | IP68 | Mixed gauge range |
| Solar PV | 2–5 | Inline, T-type | IP68 | UV resistance, 25-year rating |
| Pool / underwater | 2–3 | Inline | IP68 | Double cable-jacket seal |
| Marine | 2–3 | Male-female | IP68 | Gold contacts, salt resistance |
| Industrial | 3–5 | LP Series / panel | IP67/68 | Bayonet lock, washdown rated |
| RV / trailer | 2–3 | Compact inline | IP67 | Compact body, 12V DC |
How to Install a Waterproof Quick Connect Connector Without Making the Expensive Mistakes
These connectors really are fast to install — when the steps are done in the right order. The most common field failure isn’t a product defect. It’s a correct product incorrectly assembled, usually because someone skipped a step when they were in a hurry.
Correct installation takes four steps: thread the rubber seal plug and screw cap onto the cable before stripping anything, strip conductors to 11–14 mm (not “about 10”), open the lever, push the conductor all the way in until it physically stops, close the lever, then screw the cap down until the seal grips the jacket. The single most common failure is a wire that wasn’t pushed all the way to the bottom — the housing gets hot, the plastic softens, and eventually it melts. Each step depends on the previous one. Skipping step one means disassembling the finished joint to fix it.
Step-by-Step Field Procedure
Step 1 — Thread first, strip second. Slide the rubber seal plug and the housing cap onto the cable before you strip anything. This is the step people skip when they’re rushing. There’s no fix except to de-terminate and start over. Thread. Then strip.
Step 2 — Strip to 11–14 mm. Not less. The correct strip length for quick connect lever connectors is 11–14 mm. Strip shorter than that and the conductor tip doesn’t reach the contact point. It’ll look seated. It won’t be. For fine-stranded wire, tin the stripped end with solder first, or crimp on a copper ferrule. Raw fine-stranded wire fans out inside the housing — individual strands miss the spring cage and you get partial contact. Fine-stranded wire works reliably up to 1.5 mm². Solid single-core wire can go up to 2.5 mm². If you’re using fine-stranded 2.5 mm² wire, stop — use a screw-terminal connector instead. The lever won’t close fully on that cross-section.
Step 3 — Lever open, push all the way in, lever closed. Pull the lever up. Push the stripped conductor straight in until it physically bottoms out — not until it feels “about right.” Until it stops. Then tug it firmly. A properly seated conductor does not pull out under hand pressure. If it pulls out, push again. This step is where most failures happen. A wire that’s 2 mm short of the contact runs hot, melts the housing, and looks like a product defect. It isn’t. On transparent-housing models you can see the conductor tip at depth — use that as your confirmation.
Step 4 — Cap down until the seal grips. Thread the housing cap forward and screw it onto the body until it seats fully. The rubber plug compresses around the jacket — not the conductor. A cap that still spins freely after tightening means the gland hasn’t compressed. That joint is not IP68.
The Mistakes That Kill Jobs
| Mistake | What Happens | How to Avoid It |
|---|---|---|
| Cap not threaded before stripping | Joint must be fully disassembled to seal | Thread cap onto cable before any stripping — always |
| Strip length under 11 mm | Conductor tip doesn’t reach contact — looks fine, runs hot | Strip to exactly 11–14 mm, every time |
| Wire not pushed all the way in | Partial contact — housing overheats, plastic melts | Push until it physically stops, then tug to confirm |
| Fine-stranded wire inserted raw (no tin / no ferrule) | Strands fan out, miss the cage — same heat failure | Tin the end with solder or crimp a copper ferrule first |
| Fine-stranded 2.5 mm² in push-in connector | Lever won’t close fully — partial contact, melted housing | Use screw-terminal connector for fine-stranded 2.5 mm² |
| Cable OD too small for gland | Gland doesn’t compress — water tracks in along jacket | Match cable OD to gland range on the data sheet |
| Cap finger-tight only | IP protection not achieved — looks correct, fails wet | Tighten until cap seats fully and resists rotation |
Quick Connect vs Every Other Outdoor Wiring Method — An Honest Comparison
I’m not going to tell you lever connectors win on every dimension. They don’t. What I will give you is an honest picture of where they belong — and where other methods are genuinely better.
Waterproof lever connectors outperform wire nuts, heat-shrink splices, potting compounds, and screw terminals on installation speed and re-enterability. Crimped connectors — Deutsch, Weatherpack — hold the edge on vibration resistance in automotive and heavy machinery applications. Gel-potted boxes have the edge on permanent buried joints that will truly never be accessed again. Everything else: lever connector.
| Method | Speed | Tool | Re-Enterable | IP Level | Best Situation |
|---|---|---|---|---|---|
| Lever quick connect IP68 | 15 sec | None | Yes | IP68 | Outdoor lighting, solar, any serviceable joint |
| Screw terminal, IP-rated enclosure | 2–3 min | Screwdriver | Yes | IP65–68 | Panel wiring, torque-documented industrial joints |
| Heat-shrink butt splice | 3–5 min | Heat gun | No | IP67 | One-time repairs, automotive butt joints |
| Gel-potted junction box | Slow + set time | None | No | IP68 | Permanent buried joints with zero future access |
| Wire nut + tape | 30 sec | None | Yes | None | Indoor only — no outdoor application |
| Deutsch / Weatherpack crimp | 5–10 min | Crimp tool | Tool only | IP67–68 | High-vibration: vehicles, generators, heavy equipment |
The Decision Framework
Use a lever IP68 connector when you need fast installation, the joint may need to be opened again, and the environment includes rain, irrigation, flooding, or burial. That covers most outdoor lighting, solar balance-of-system, pool surrounds, and low-voltage landscape work.
Use gel potting when the connection is genuinely permanent — underground mid-run splices with no future access and no circuit changes planned. Ever.
Use crimped Deutsch or Weatherpack connectors in vibrating environments: diesel generators, agricultural equipment, utility trailers. Lever connectors can work loose under high-cycle vibration that crimped contacts handle without issue.
Use torqued screw terminals in an IP-rated panel enclosure when connections need to be documented, inspected at intervals, and torque-verified. That’s the standard for commercial and industrial panel wiring — and it’s the right call for that context.
Frequently Asked Questions
Can waterproof lever connectors be reused?
Yes. The lever-type IP68 housing opens and re-closes multiple times without degrading the waterproof seal — as long as the rubber gland isn’t damaged and the cable OD stays within the specified gland range. Gel-sealed alternatives like the WAGO Gelbox can technically be reopened, but the manufacturer doesn’t guarantee the IP rating holds after re-entry. If you expect to access the joint more than once, lever type is the right call.
What wire sizes do these connectors accept?
It depends on the wire type. For solid single-core wire, push-in lever connectors work up to 2.5 mm² — the stiff conductor pushes cleanly to the bottom and seats reliably. For fine-stranded (multi-core) wire, the reliable limit is 1.5 mm². Always tin the stripped end or crimp on a copper ferrule first — raw fine-stranded wire fans out inside the housing, strands escape the spring cage, and you get partial contact and heat buildup. Using fine-stranded 2.5 mm² in a push-in connector is a common mistake: the lever won’t close fully on that cross-section. Use a screw-terminal connector instead. The correct strip length is 11–14 mm for all wire types — short of that, the conductor tip won’t reach the contact.
Are these connectors UL listed?
Quality products carry cUL (North America), CE (Europe), TUV, and SAA (Australia). The certification that matters is the one required in your target market. Ask for the certificate number and verify it against the certifying body’s public registry. A logo on packaging isn’t a certification. A number you can look up is.
Can I use them for direct underground burial?
IP68-certified connectors are rated for continuous submersion and are suitable for direct burial — but the cable attached to them needs a direct-burial or wet-location rating too. The connector seal covers the joint itself, not the cable run. Also confirm the submersion depth rating matches your burial depth. Most specs run from 1 to 4 metres depending on the product.
How do I verify the conductor is properly seated?
Most quality lever connectors have transparent or translucent housings so you can see the conductor tip at the correct depth. If it’s visible and positioned correctly, the connection is made. If it’s not visible, the conductor didn’t reach the contact — open the lever, push further, and close again. Don’t rely on a pull test alone. A conductor can sit at marginal depth, pass a hand pull, and still fail under load.
What voltage and current do they handle?
Standard IP68 lever connectors are typically rated 450V AC and 16A or 24A depending on the model. For 12V DC landscape lighting, most zone current draws are well within the 16A limit. For solar DC strings, confirm the connector’s DC voltage rating explicitly — AC and DC ratings are not interchangeable, and DC ratings are often lower due to arc characteristics.
What temperature range do they operate in?
PA66 UL94 V-0 housings are rated -40°C to 105°C operating temperature. That covers desert solar, sub-arctic outdoor lighting, and high-ambient industrial environments. If a product page gives you an ambient temperature without specifying the housing material and its rating standard — that number is marketing, not engineering.
How long do they last in outdoor installations?
Correctly specified and correctly installed — cable OD matched to the gland, cap torqued to full seat, conductor properly stripped and fully inserted — IP68 lever connectors from certified suppliers typically deliver 10 to 20 years of service. The ones that fail at 18 months are almost always installed with the wrong cable OD or a loose gland cap. It’s not the product. It’s the installation. Specification and assembly quality matter far more than the product itself.
Conclusion
The connector is the cheapest component in any outdoor wiring system — and often the one that decides whether everything else holds up. Get three things right: a verified IP68 certification, a cable OD that matches the gland range, and a current calculation based on total circuit load rather than per-fixture draw. Do that, and a quality lever connector will outlast most of the system around it. Miss any one of them, and it won’t matter how good the rest of the job is.